Tuesday, August 18, 2009

$40.00 a Minute Wedding


For thirteen years my brother and his childhood friend Greg lived at the Oxon Hill Manor House. Free room and board through their college years and career beginning jobs in exchange for setting up for the grand weddings that would take place in the beautiful ballroom.


On the day of weddings, John and Greg were required to wear brown one piece shiny jumpsuits that had embroidered oval name tags. They were required to wear these as directed by a woman with a tight bun and click clacky heels. 

Parquet floors reflecting the warm glow of crystal chandeliers, grand piano in place, the lead soprano of the Washington Opera awaiting her accompanist to begin her warm up. My brother notices her distress and approaches her. "I can accompany you if you have your music."


The strands of La Bohemia reaching the event director's office were soon followed by the click clacking of her heels across the marble foyer. "How many times have I directed that you are NEVER EVER to touch this piano! This is a $40.00 a minute wedding! It is specially tuned. Your job here is done for now, wait in your room until I call you."

Click clacking again across the marble foyer just in time to catch my brother as he ascended the beautiful staircase to his room. "Do you have a tuxedo?" "Yes, I have a tuxedo." replied my brother. "Then put it on quickly and meet me back here in ten minutes."


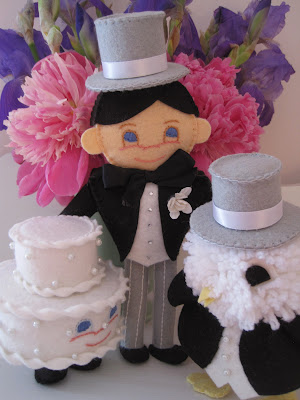
My brother did as he was told. "The accompanist is unable to be here. Can you play for the soloist?" My brother, tall and handsome in his tuxedo politely replied, "No I can't. I'm worth more than $40.00 a minute." With that he calmly returned to his room.


Monday, August 17, 2009

The Block Party

The end of a party is always the best. Tired from milling about the guests will settle themselves comfortably, quietness settling about them. Lamps are turned on, shoes are kicked off, legs are tucked underneath. The day's events are recalled, moments of observation shared.


A circle of women making room for someone new. A compliment here, an exclamation there, shared values drawing them close.

Shared laughter letting them know they are not alone.


I am not a Giver of Parties content to be an invited guest. Fearful of being the center of attention, fearful of saying the wrong word, fearful of disappointing.


Hosting my first tag swap is such a milestone in my journey. I continue to struggle with the acceptance of friendship; but as  I gaze at the art of the women who shared themselves with me, I am surrounded by friends. Elizabeth

Friday, July 24, 2009

Scottie Garland


Who doesn't love a banner celebrating all things Scottie dog! There are so many wonderful vintage greeting card images of this most beloved terrier to be found on Flickr.
 
I used as the base of my garland, four inch squares cut from card stock. With each layer of printed paper added, I assured my paper art would look as fresh as when made, years from now. I chose coordinating papers and limited my main colors to three; red, yellow, and blue. My secondary color is aqua, and my anchor color is black.


I love garlands that spell out a word. My word was easy to choose.... S C O T T I E !!! Because I love words so very much, I added additional words to each square.

I used black rub-on's for that anchor I talked about. A great tip when creating with paper is that they should never "drop" as it moves along. The black I have used causes the eye to move as though following rick-rack.

Buttons! There always has to be buttons! And do you notice all of the little odd words? They are found at the bottom of the CC paper. The names given to each pattern of paper make me smile.

Here I used two half moon shapes to each side of my square. An envelope flap would also be cute.

On each square I chose one element to stand out by using sticky foam pieces. Here I made the window frame stand above the little Scotties playing. So Cute!

A last step to add additional sturdiness and to continue the theme of the flash card words. I have added them to the back of each tag. A hole punched in each corner, a ribbon length knotted at each end to connect the squares.

Crocheted cherries to anchor the ends of my garland, and there you have it! A Cute as Can Be garland to hang in my craft room.

Sunday, July 12, 2009

Elizabeth's Pegdoll


I love pegdolls! I love that there are endless ways to express your own personality with just a clothespin and a bit of fabric. I thought I would share my pegdoll voice with you in the hopes you will join the chorus!


Gather your supplies, and set aside an afternoon. The wooden pieces can be found at your local craft store. A few basic paint colors, craft varnish, paint brushes (use what you have), felt for this version, and your trusty glue gun. Pipe cleaner, embroidery floss is optional.


I love my efficient system for painting the pieces. (Otherwise you have heads and bodies rolling everywhere!) For our pegdoll today, paint white for her boots at the bottom of the pin. I paint three coats of each color.


Transfer your base to your pin, and paint the bottoms same color as base. When the paint is thoroughly dry, glue the head in place. Your doll is ready for a face.


My face is very easy to paint. Eyes are the distance apart of the body opening. Cheeks just to the right of each eye. Mouth begins in the center of the eye, sweeping to the left. Notice the brushes? Easy, peasy! Two coats of varnish, drying between each coat. It is time for a basic dress pattern that I have used in many variations for my dolls.


Click on pattern to enlarge, print. Look at finished photo for colors.


Center and glue sparingly the bodice to body, butting edges in back. Center skirt on bodice, stretch felt around waist to meet in center of back, glue. (NOTE If you want a white trim, do that step first.)


The sleeves have also been embroidered as a detail but not necessary. Pipe cleaner is cut just a bit longer than sleeve.Two mitten shapes are free cut and glued to each side of pipe cleaner. Roll one side of felt around pipe cleaner adding a thin line of glue just before reaching the other end. Make sure your thumbs are facing the right way! Bend arms slightly and glue in place on bodice
.

The uniform front is embroidered and glued in place. Little details are also made. A tooth pick and tiny poms for the baton, floss tied in a knot and trimmed for boot tassels.


Hair that you can glue on? How wonderful! Strips are rolled in the fingers. Apply a dot of glue to the last turn to secure and on the back of the remaining tab to glue in place. Two strands of floss tied at one end and twisted in opposite directions, bring ends together to form a braid for the hat.


Dolls that are not going to wear a hat have curls that cover the entire head.


Hat band proportion is just slightly narrower than sleeve width. After gluing to hat top and brim, I trimmed any excess felt. A feather, a little sparkle, this majorette is ready for a parade!


I love that you can identify the creative voice behind each pegdoll by specific details they incorporate. My voice is a simple one. I want the doll to immediately capture a remembered moment by their clothing alone. If I do add a prop, just one. The hair? Well I have been known my whole life for my hair; so that is my signature touch. I hope will be inspired to create your own pegdoll voice!


Friday, June 26, 2009

River Heights, USA


When I first explored the streets of my town from my little blue roadster, I was struck by a comfortable familiarity. "A sleepy tree-lined Midwestern suburbia formed by the winding bends of a river." Oh my gosh, Delaware could be the inspiration for River Heights, USA. "Home to famous mystery case attorney, Carson Drew and his daughter Nancy."


A town filled with bungalows and unsavory ruffians casing them for hidden treasure. Check, we've got those
.

Old attics hidden behind secret staircases? You bet!


Larkspur Lane? Well, I haven't found it yet; but in my trusty blue roadster, I'll be on this case until solved! Nancy Drew was the heroine of my childhood. Plucky and independent. A car of her own and a fantastic wardrobe. My willful streak I owe to Nancy Drew!


Great information and book covers can be found at www.nancydrewsleuth.com

Monday, June 8, 2009

"CHRISTMAS" Garland

I hope you will have as much fun making these little ornaments as I did! I also hope you will be inspired as I was to use only what can be found in the nooks and crannies of your craft room. This is what I call Creative Breathing!


ICE SKATE:  Begin top right of boot, button stitch catching hanger. Insert tinsel blade, continue stitching around boot bottom. Stuff, stitch close top of boot. With thread still on needle, tack on fluffy pipe cleaner. Use craft glue to attach sole to boot. Lace boot from bottom up, tie knot, thread string onto needle, pull through pom poms. Tie knot, slightly pull through to hide string.


SNOWFLAKE:  Bend 2 stems in half, cut. Bend in half again. Twist together one pipe cleaner to the left, one to the right with each added. Hot glue small button to back of snowflake, large button on front. Bend remaining stem in half, cut, fold into fourths, cut, use 6 pieces to twist onto spokes of snowflake. Trim to desired length with wire cutters.


ANGEL: This caroling angel is made using the same steps as Santa. Stitch angel face and buttons on first. Whip stitch angel closed tucking in hanging string with last stitches. Inch long piece of tinsel pipe cleaner slips onto head. Secure with stitch in back!

SANTA: Cut opening for face using small pattern circle. Place face piece behind opening, attach with button stitch. Stitch face. Curl one end of beard strip, secure with stitch. Attach beard, hat strip, belt with glue. Stitch mouth. Stitch belt button. Whip stitch body closed securing hanger, sew on button.


HOUSE: Stitch in place door, use craft punch, punch red circle, insert. Attach snowflake.

HOUSE: BS short stitch strip to roof pieces, punch holes. BS long strip to house front, back, stuff. Thread hanging cord, insert peak roof. Glue roof in place.


TREE:  Whip stitch closed ea. circle and trunk. To assemble: pull needle up through bottom of  first piece, take a stitch in it's top to secure. Repeat securing stitch with each tree piece. Thread bead, create hanger, go back through bead and top of tree, tie knot.


REINDEER: BS and fill ea. leg. BS body catching hanging thread. BS head catching antlers, leave bottom open, stuff, attach to body. Attach ears, tail.


MOUSE: BS body one direction and then running stitch back the other way; turn right side out. Gather opening with running stitch, stuff, pull close. BS base to bottom. Attach eyes, ears, mouth, tail,  and candy cane. Create hanger by stitching in place and knotting.


ASSEMBLY: I used only what I had on hand! A little spool of .99 cent rick-rack, fabric scraps, bits and bobs found tucked away for just this purpose, and paper scraps left over from a Christmas project.Can you guess what this garland spells? CHRISTMAS!!!