

The grey days of a Midwestern winter are here, but inside my craft room, things are Merry and Bright. Long awaited arrival of October Afternoon fulfills my wish to make a most wonderful countdown garland to share with you! Every saved scrap of greeting card and items sent in the mail are perfect for this project. A how to for you!

STEP ONE - GATHER on your craft desk everything you like! Letters that don't have go-afters, odd buttons, favorite scraps saved from greeting cards, embellishments that hadn't the right Place to Be, anything at all that pleases your eye.

STEP TWO - ORGANIZE BY COLOR all of the items you have gathered. By doing this the color scheme of your garland will emerge. Anything that did not fit into one of these piles, I did not use. Sandy, 521 Lake Street, sent me the wonderful vintage wooden Christmas ornaments which will remind me of her each time I look at my garland.

STEP THREE - GATHER YOUR SUPPLIES Craft tip - Do you have a spool of wire and needle nose wire cutters? I don't think a crafting day goes by that I don't use these. I will make little loops to hang each tag from my garland.

STEP FOUR - CLEAR YOUR WORK SPACE I have gathered all of the items I will use in my garland and placed them on a small table to my side. I have put away everything that I will not be using. This helps bring out my creativity.

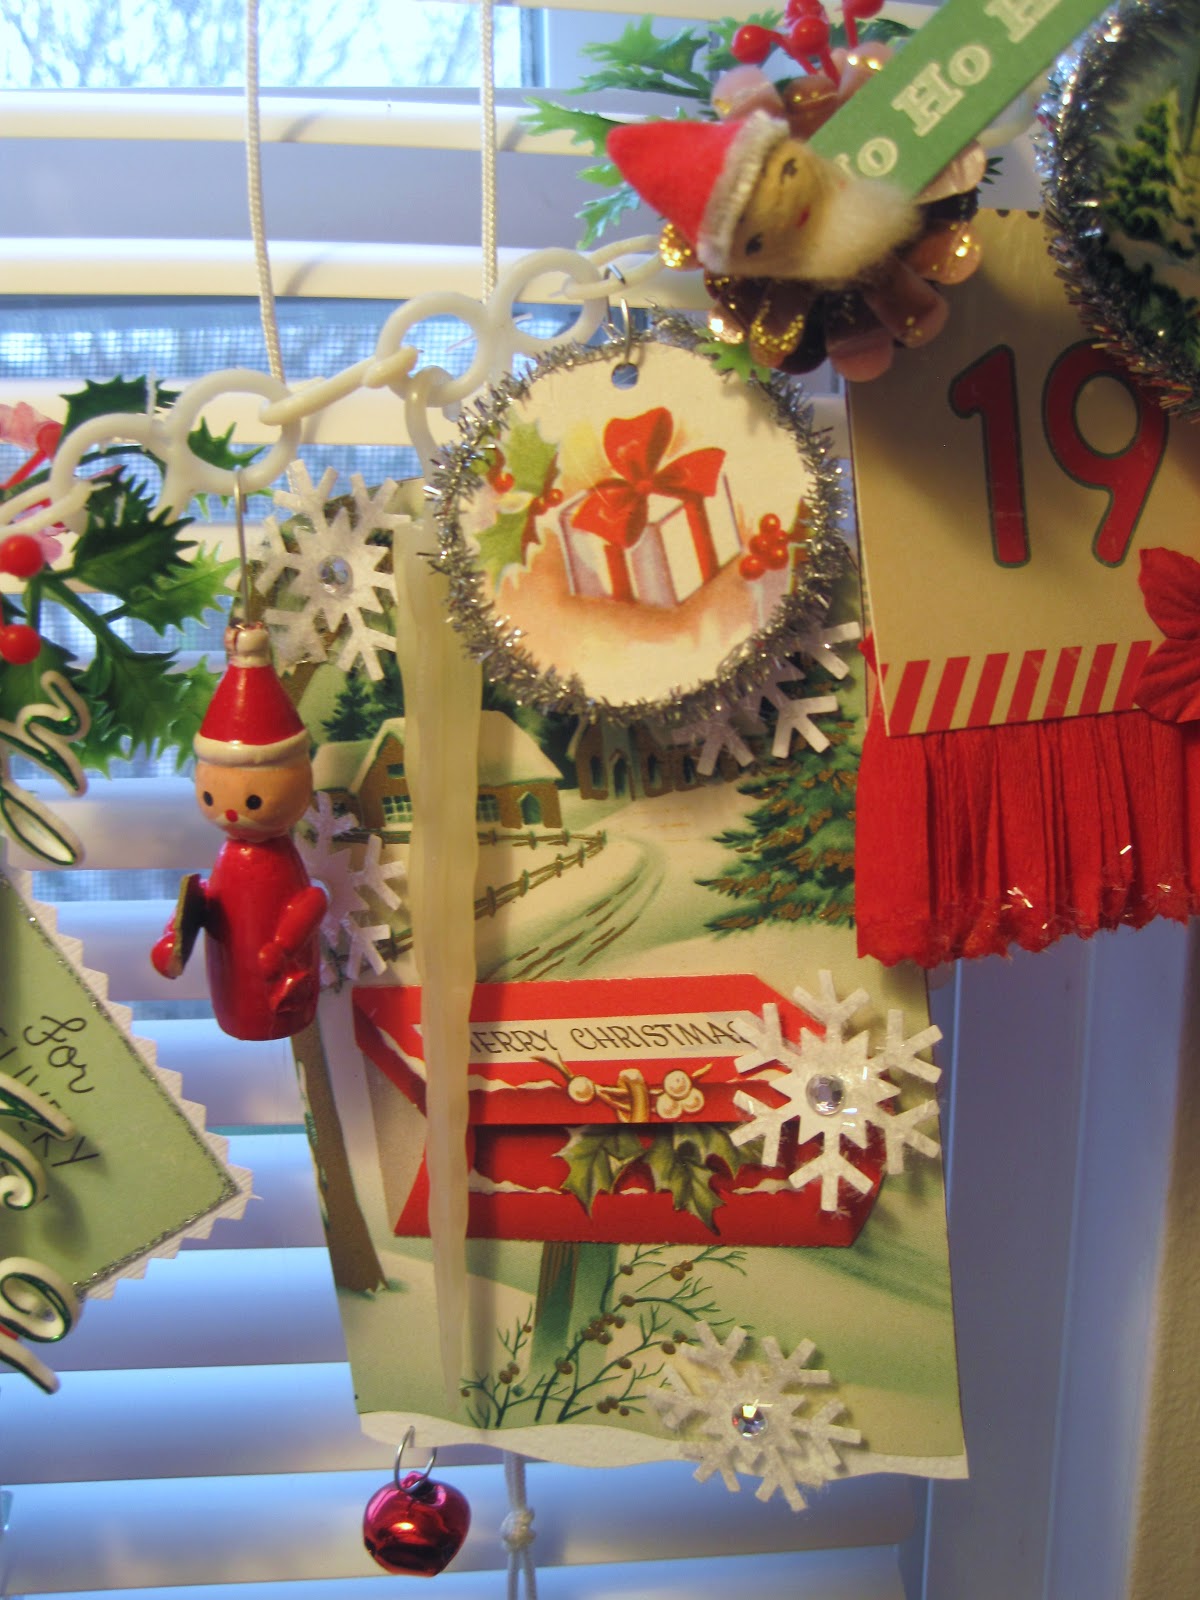
STEP FIVE - DIVIDE AND CONQUER! A garland no matter the length can easily be managed by repeating a pattern within uniform lengths of space. My garland is six-feet long; so I will have six areas that will repeat the same pattern. MAIN FOCAL POINT - One LARGE tag made for each divided space. CRAFT TIP - Because my garland hangs in a window, I have sandwiched cardboard between front and back printed papers.

MEDIUM AND SMALL tags are created enough for each divided length of space.

VARY YOUR SHAPES - Because most of my tags are square or rectangle, I have made small silvery "coins" to give the garland sparkle. CRAFT TIP - Create one large and small sized cardboard circle for each divided length of garland. Place cardboard behind image and hold up to the light to center. Glue stick in place and THEN trim. Repeat with back image.

STEP SIX - TIME FOR FUN! Oh my gosh! I can't express enough how much fun it is to use all of the Inside Images of vintage greeting cards I have saved from all of my paper projects. They are my very favorite. I was so excited that this delicate card border found the perfect Place to Be. Beautiful!

Little ornament stickers left over from my Mitten Garland fit right in with my color scheme. Left over flowers, jingle bells, and Greetings are used in such a happy way.

HAPPY NEW YEAR! A most favorite story ever shared, here ,is represented with this tag. CRAFT TIP - Vary the types of numbers used in your Countdown Garland. Coming across unexpected numbers in unexpected places will draw the viewer in for a closer look.

SEE THE PATTERN? Focal Point, medium and small tags, something rectangle, something round large and small, wooden ornament, and countdown number "8".

GARLANDS - I have purchased my vintage plastic garland several times now on Etsy or Ebay at a very minimal price. I have also used Ric Rac for this type of garland on several occasions. Use What's on Hand!

I'm giggling that this may very well be my lengthiest post ever as my garland is so very long! SIGH! Another inside scene used on the "4" tag.
I'm often asked how I can possibly cut into my beautiful vintage greeting cards rather than use copies. Do what feels right for you. For me, I am creating art by using the originals in a way not intended but none the less in a way to still enjoy the beautiful workmanship.

I hope these many examples of my own garland will perhaps inspire you to create one of your own. Making each tag special will result in something to enjoy year after year.


And please if you should create a Merry & Bright Garland, I do hope you will share it with me!
42 comments:
This is precious...what cute goodies you had!! Great tutorial.
Karen
Gorgeous...I had to look at it twice. So much vintage and paper goodness...thank you for the tutorial..smiles..Renee
Thank you so much for the tutorial! What an absolutely beautiful vintage garland - I love it. Now, I must pop in my favorite movie "Holiday Inn" and create my own garland. Have a wonderful week! Teresa
It's lovely and vintagey,(if thats even a word). I'm am determined to make one of these. Thank you again for all the great tips and how to's.
I've been saving my vintage plastic Christmas garland for something special and this garland tutorial is the perfect inspiration. Christmas hugs!
It's a wonderful Christmas garland! So many awesome little treasures in it! I think October Afternoon has the custest paper!
Guess I need to be on the look out this summer for some plastic garland!
Warmly,
deb
That is so cute! I may take a try at it.... but I will have to work on gathering the materials. Thanks for the inspiration.
Blessings,
Amy Jo
Yes, I also had to go back and look at it all again! It's beautiful...every little detail.
Thank you for all the great tips E!
Erica :)
Me again. So glad you like it. The big circle is a brie cheese box-I save them-they are made out of a thin wood, and I knew they'd come in handy someday!
Darling project as usual Elizabeth. I can't believe how tidy and organized you are when you craft. My photos would be a jumbled mess of doo-dads.
You make it look so easy.
So pretty. I could look at it 100 times and see something new each time.
Chris =]
What a wonderful garland, E! I always love your pix because they are so interesting and show such cutie pie things!! Everything you put together is always totally charming!!
Hugs,
Sandie
I think you are brilliant! I would have never been able to pull together such a fabulous array of items to incorporate! But you did it in a perfectly organized way. And you shared it so beautifully, so easy to follow along, so clear the steps. BRAVO (clapping, clapping and more clapping!)
Thank you sweetie, your banner is gorgeous!
Hugs,
Terri
Thank you! Once again you have knocked my socks off with your fantastic eye for composition. Love it.
Thank you for the lovely tutorial on garland making 'E. Style' I love it. I must scope out my Christmas craft stuff and see if I can make one! I did make your felt forest gnome garland which hangs in my fairy cottage you know!
how beautiful and what a joy to just look at it.. and see all the different things each time you look.
have a wonderful holiday and thanks so much for sharing with us
It's wonderful, Elizabeth! I love the different shapes and sizes. You are right, it does make it more enjoyable to look at and draw your eye in to see each element.
Elizabeth you should see My beautiful wreath you gave me the kit for.I love it, thank you again .I think I bought the wrong size wire frame,a little to big,So I added more tags with same color and style. It's wonderful,just like the window kit last year.
What an incredibly wonderful garland! Such great variety and sparkle. Every little detail is just right. Thank you for sharing!
This is such a fun, detailed garland! Something new to look at all through it. Thanks for sharing your incredible artwork.
I just put together some little shadow box ornaments from this same darling paper...thought I was through...but after seeing your beautiful garland...I have so much more to create.. Thank you for always sharing such sweet treasures with us!!! Happy Holidays to you and your family!
Good grief Charlie Brown! Thats the best countdown ever! I love the new spin on OA and the old spin on old cards! Now, I imagine you need more space on Picassa with all those pix! Ho Ho Ho!
Wow, it is truly gorgeous!! Love all your sweet and vintagey touches!! Thank you for sharing Elizabeth!! So inspiring! xo Heather
Wow this is so gorgeous!! I love it, so many pretties, and vintage goodness strung together! Thanks for sharing how you made it too! This is so inspiring!! :) Have a wonderful week and Christmas hugs! xo Holly
I love love this!!!! Just adorable, and so creative!! May I ask how you store it away? Will it kind of lay flat?
Hugs,
Debbie
So very beautiful, dear Elizabeth--as always! And such a wonderful tutorial to go along with it...
Wishing you the most wonderful first week of December, my friend!
Julie
Oh E!!!!!
This is wonderful! I have goosebumps! Just adore it!!!! I can't wait to get my OA paper! :) I don't have all of the fun plastic stuff though...where did you get that?
Sandy
Oh E, You make the most fabulousest garlands. Yes fabulousest is a word:)
Julie
Oh my - thank you so very very much for sharing this wonderful garland. I recently found a box of old cards and was trying to decide how to use them. I will most definitely create a garland - your ideas are wonderful!
Elizabeth, I just wrote you the most eloquent and witty comment ever ahhahhahaha and it went POOF! I got a weird message and it wouldn't refresh the screen - I guess the post was deleted?
Anyway, thank you so much for your comments on my blog, so sweet of you. Do you still have your Wee Forest Folk? I sold most of mine but kept the holiday ones and a couple of favorites.
Happy week to you! xo
That is just precious! I'll try to remember all of your tips!
So beautiful and cute post, very lovely.
Parfum pas cher
I'm right here with you. I too use the originals, there is so much fun to be found and used to create. I just say say three cheers and make it!
Thanks for sharing your "how to do it" post. We always see such amazing results from you and it's fun to see how you do it and I like the idea of using bits and pieces of what you have. There is a certain satisfaction in doing that and then we can go hunt for more.
I'm enjoying my journey, once again with you.
Happy Wednesday from the girl with the curl.
Co cute Elizabeth! Thanks for stopping by my blog. Wish you were with Viv and I over the weekend! BTW,I mentioned you in my blog post here:
http://sandy-sandyscreations.blogspot.ca/2012/12/warming-up-by-theglue-gun.html
Happy December!
Sandy xox
Elizabeth,
I just love these, and came back to look at them again. The garland reminds me of a charm bracelet!! May I ask where you get the little silver rings to attach the cards and things? would you happen to know where I can find the tickets, that say cider? Thanks so much!
Debbie
Wow! Such inspiration! Wish I lived near you...I would love to have you as my crafting mentor! ;p
seriously, who needs anti-depressants when we have you? YOU ROCK!!!
Hi Elizabeth,
I saw this on Pinterest and fell in love with it! Thank you for sharing this.
Hugs, Lynnie
I appreciate, cause I found just what I was looking for. You’ve ended my four day long hunt! God Bless you man. Have a nice day. Bye
I am so glad I found this page! It is exquisite. I wish with all my heart that October Afternoon was still available, as I see some ideas here that I LOVE! (I've found a little on Etsy, but not all) Thank you for sharing your talent.
This is just as precious today 1/1/2021 as it was when you first made this! I am late to the party. I have started purchasing kitschy Christmas items and will be making my own-thank you for the inspiration!
I absolutely love this!!!
Post a Comment