Sunday, July 29, 2012

Take Me To Your Leader


My childhood life in Apartment 2A, Embassy Row, was filled with fantastical daily adventures as a card carrying member of the Spy Club. We were an international organization, our fathers and mothers in the employee of various government agencies from various countries. Language was never a barrier when mischievous pranks were the order of the day, gullibility in a young girl all that was necessary.


Carolyn Johnson was my very best friend from Apartment 4B whose bedroom was tucked underneath the space created by the building's central staircase. Older by several years, I hung on Carolyn's every word and mannerism. She was a Correspondent Student, her books and supplies arriving in boxes wrapped in brown paper cool to the touch. Everything about Carolyn was interesting, especially her three older brothers, the founding members of the Spy Club. I hung on their every words as well. When they told me they were Martians from Outer Space, I already nearly believed them. Disappearing before my very eyes, sealed the deal.


Ushered into the realm that was their orderly bedroom, we were situated bedspread edge facing the large balcony that was exactly like my very own. "Close your eyes, and count to ten. We will dematerialize into thin air." Eyes wide open, the space before them completely empty. Did Carolyn's parents know their sons were from Outer Space?


The characters that inhabit my craft room tell the stories of my life. Eyes Wide Open and a very cute Space Cadet recall brothers much too clever for a little girl who to this day is known for being gullible and who always sends her crafts in boxes wrapped in brown paper.

Friday, July 27, 2012

Flamingo Button Keeper Tutorial


Have you taken the Button Keep Challenge? It's only almost August and not at all to late to begin. A button keep for each month of the year, twelve projects to bring you lots and lots of smiles. I have represented the Perfectly Perfect Purveyor of all things Floridian for my kitschy topper.


There was not one single doubt in my mind that my August Button Keep would represent Florida at it's heyday of seashell souvenirs. There is just something about teeny tiny seashells attached to household items that just sends me.


SUPPLIES: Gathering together possible supplies needed was not an easy thing in the heart of the Midwest. Thank goodness Michaels has seashells by the oodles to purchase inexpensively. I printed my vintage FLORIDA postcard wallet size and cut apart each letter. (I ended up not using wire)


LID: The cutest of canning jars purchased a dozen for $7.00 at WalMart. Trace lid on cardboard, cut out. Trace cut out on back of blue area of map atlas, cut around drawn circle, enough room to later pink edges. Glue stick to white card stock, pink around drawn line.


Cut strip of cardboard width of jar lid edge, hot glue to edge of lid. (Note slight space) Glue lid seal to inside of ring, optional. Build up depression in lid with several layers of cardboard. Cut white card stock strip and map strip slightly wider than cardboard strip. Pink edge of either map strip or white strip. Hot glue to cardboard strip on lid. Hot glue pinked round to lid. Now for the fun part!


OHMYGOSH!OHMYGOSH!OHMYGOSH!


An optional step, but one that truly gives this craft it's umph, lightly apply two coats of Modge Podge to lid and strip as well as cut out letters.


Hot glue main shells in place after finding pleasing arrangement.


FLAMINGO:  Bend stem end into teardrop shape, twist to secure, bend at right angle, trim with wire cutters about 1 1/2". Body: Coil one pipe stem around wide part of pen towards pen point. Wide end slips over tear drop. Neck: Coil pipe stem around small paint brush desired length of neck, trim. Head: Coil pipe stem beginning just before pen point to point. LEGS: Bend pipe stem right angle to create foot, U bend at leg length desired, right angle again to create foot.


ASSEMBLY: Slip wide end of body coil over teardrop, pinch end of teardrop to create tail. Slip neck coil over straight stem, bend at right angle to create head. Slip on head coil. Insert small bent black stem for beak, glue eyes in place.Slip leg U between coils. Wings, length of stem bent towards center, slip between coils.


Vintage buttons washed up on shore, candle holders filled with pearls, Dominos played by Boca Raton retirees. There just couldn't be a cuter place to store my buttons.


July and August Button Keepers side by side. Dare I hope September will be just as wonderful? I do hope you will take the challenge and create a button keeper of your own design or copy one of mine. If you do, please let me know!

Monday, July 23, 2012

Tour de France!


Oh my goodness! Who would expect a peloton of colorful cyclist whizzing by to inspire the cutest ever spectators. This little French duck and his Wait-and-See companion seem to be enthralled by the excitement of the Tour de France.


Viva la France! This little duck wears his country's colors proudly. His Napoleonic collar is eight layers of crepe gathered by hand along one edge with a running stitch. Layers separated, the collar is glued on upside down.


Could a feline spectator wear a more perfect hat? I love to using vintage greeting cards to make cone shaped hats. Ruffles are made by stitching down the center of layers of crepe on the sewing machine. Width determined, edges pinked, cut between pinks to sewing line.. Hot glue in place, separate layers of crepe.


A vantage point high above the crowd. Wooden dowels are inserted into large Styrofoam balls after Paperclay has been applied.


Simply adorable! Striped sticks are the perfect final touch. Thin strip of crepe is secured with hot glue just under head shape and spiraled down stick. Secure with glue again. July crafting comes to an end on the final day of the Tour de France. What a wonderful day this has been.


Saturday, July 21, 2012

Wise Old Owl


I know it is the middle of summer, but inspiration seems to have no seasonal boundaries. I smiled with every stitch taken as this very fat and wise owl appeared before my eyes.


When I went to file his photo away on my computer, his autumnal colors drew my eye to previous projects with the same color pallet. A most favorite paper garland made with ME images.


I do think I will have to add it to the list of crafts I have been remaking for my craft room. Scotties in sweaters, too cute!


I especially love his stripy legs! Seasonally challenged? You bet when characters this cute need to make their presence known!


Pattern for personal use only.

Wednesday, July 18, 2012

Styrofoam Bird Tutorial


My gosh is there ever a commotion among the characters of my craft room. It seems the postal workers of Creative Breathing are complaining there are just TOO many BINGO cards left about when I am crafting.


They have assigned the title of Bingo Collector to the representative of the July Button Keeper Challenge. He is slightly nervous about being the first and hopes to be joined by other Button Keepers.


BODY: Press Creative Paper Clay onto the surface of large and small Styrofoam balls. Roll between palms to smooth. (Clay found at Michaels, $10.00) Dry shapes in front of fan.


LID/HAT:  Three Bingo cards are used to make Bingo Collector. TIP: Use same household items repeatedly to create shapes to give a consistency to crafts.


Create card stock base to glue decorative strip upon wide enough to cover edge of container top. Cut out center of hat brim.


(Canning Jars-WalMart 12 for $7.50.) Glue seal to ring. Fill depression with cardboard. IMPORTANT STEP: With any lid used make sure to hot glue card stock base to EDGE of lid. (Note the slight space between paper and lid) Glue decorative strips in place.


Trace around edge of papered lid to create template. Trace onto printed card and pink along drawn line. Glue pinked round to lid, glitter along drawn line.


HAT: Glue edges of BINGO strip together. (Small strip of paper on inside helps) Apply glue to top edge of BINGO circle and position around FREE SPACE. Trim away excess. Apply glue to base of BINGO and adhere to hat brim. Glue Tinsel stem, feather, button in place.


FEATHERS: Pleat crepe 25 times, press pleats firmly together, pink one edge, trim to length.


It seems the little BINGO Collector is making a case for additional help.


PAINT: Body and head white using large round brush, eyes black using liner brush, cheeks pink using dry brush technique. Apply craft varnish to eyes.


GLITTER: Working quickly, apply thin coat of Mod Podge around eyes and front half of head. Apply glitter. Repeat with head back. Holding pipe stems, glitter body front, body back.


ASSEMBLY: Immediately glue feet to lid. Glue button markers, hat, and beak in place. Let body glitter dry several minutes before adhering feathers and tie.


Apply glue to flat end of crepe tail, adhere to body and fan pleats. Hold in place several seconds.


Apply thin bead of glue from back to front along body side.


Position flat end of wing in center of body, fan pleats towards back to adhere, towards front to adhere. Hold in place several seconds.


YEAH! It seems he won his argument and has additional help in picking up all the BINGO cards that can be found in my craft room. I hope you will stop by next month to see my August Button Keeper. Perhaps you will have one to share with me as well!


ROCKETEER GIVEAWAY WINNER: Leslie of Craftyles


Tuesday, July 17, 2012

Where Bloggers Create, 2012


Have you been enjoying visiting the craft rooms of the women Where Bloggers Create, 2012 at Karen Valentine's, My Desert Cottage? I don't believe my head found rest upon my pillow until the small morning hours. I so wanted to visit just one more place of inspiration.


To share your creative space is to wear your heart on your sleeve. A glimpse into the core of your true personality and how it finds it's way into your art. The hope for acceptance, the hope for inclusion.


This is the doorway to my heart. This is the way to Creative Breathing.


It all began for me with a Bluebird. An image chosen for my Profile has become the symbol of my blog. I hoped from the very beginning to create a blog that would capture in words and images the way I feel when I look at this sweet vintage Valentine.


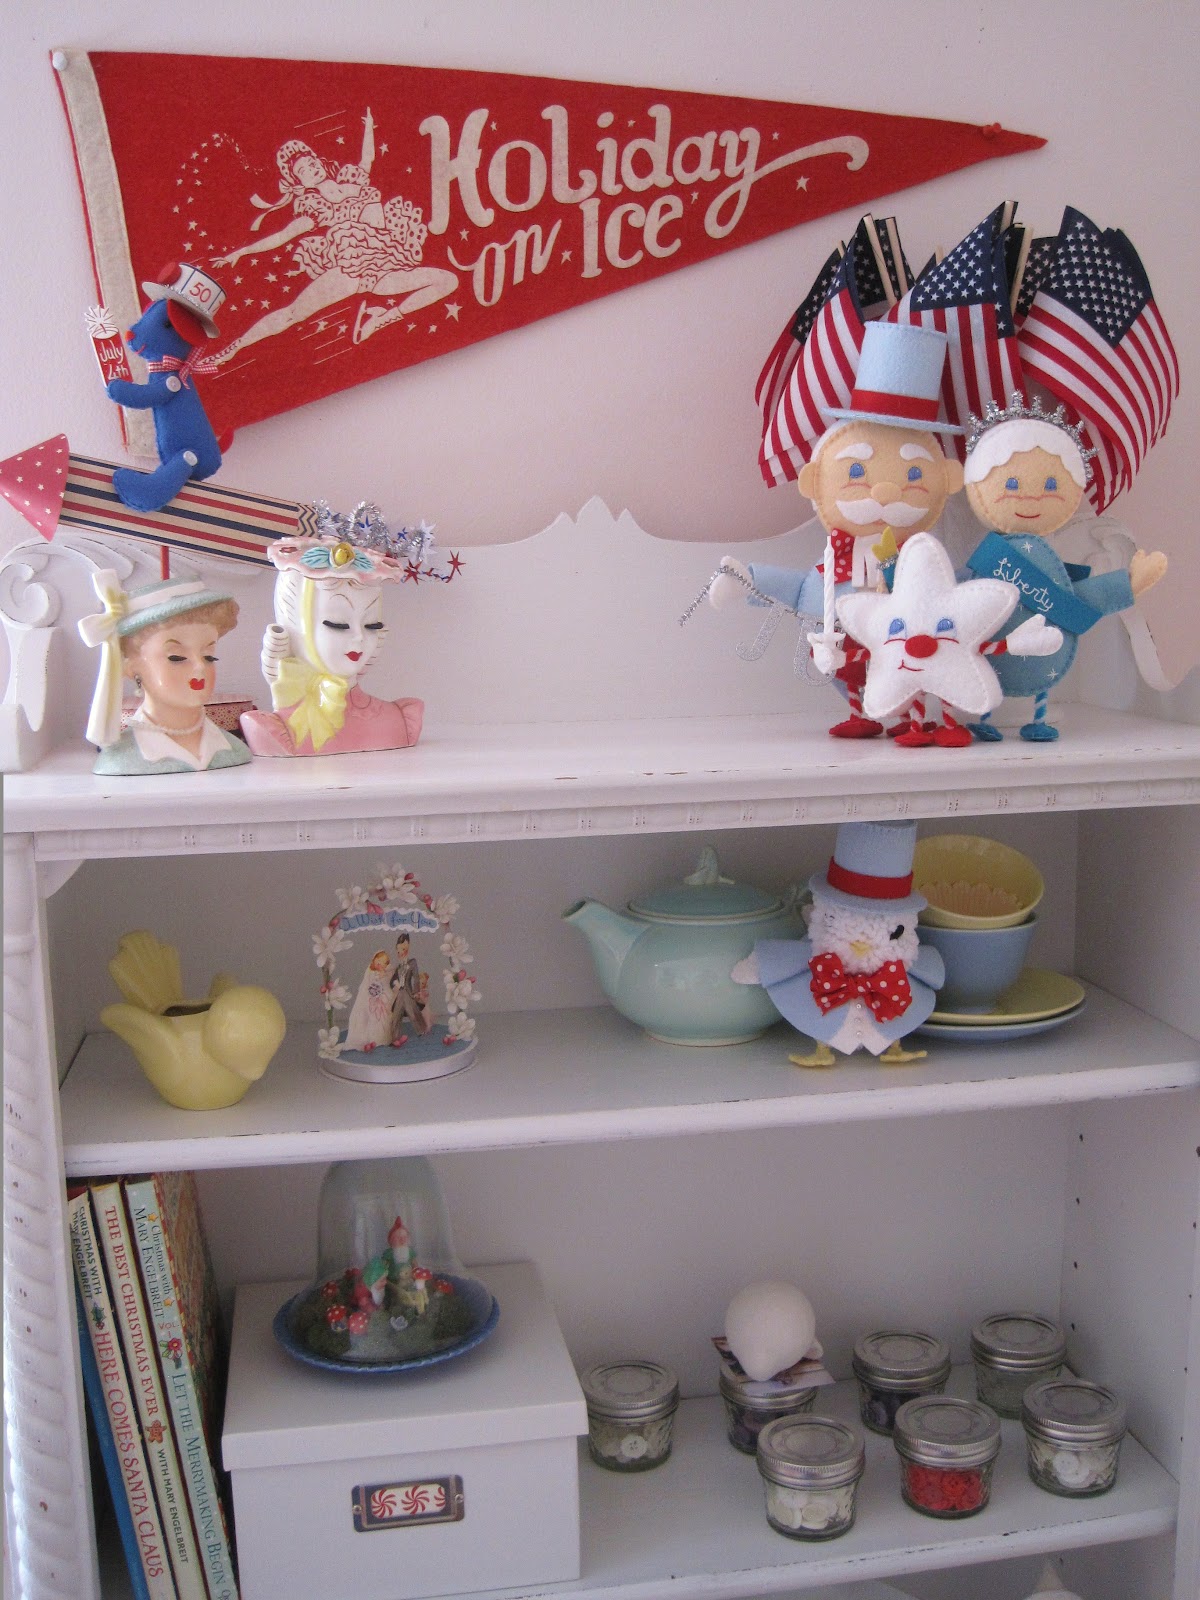
If you should peek into my craft room, I hope my Anniversary Hoosier will make you smile. I know it does me each and every time I enter this space.  Found tucked away in an antique mall just waiting for me to pass by, a telephone call to my husband, a delivery the very same day.


There is always a holiday to celebrate in my craft room. The shelves of my Hoosier teem with the chatter of characters busily planning their own special day. When it's their turn, they appear front and center on the large expanse of enamel gleaming like a polished dance floor.


If it can be said that the Hoosier shelves belong to my characters,


it's drawers belong to mE! On this, I stand FIRM! There would be no Craft Room Characters if there were no pipe cleaner stems.


I am a prolific crafter and can barely keep my craft room stocked with supplies. I never thought I would be a person who could run out of orange pipe cleaner stems, but apparently I am. I only need this inside space of the bottom of my cupboard to hold my paper.


I am a Use What's on Hand kind of girl; so a happy pie box holds yarn to make pom pom birds, a scrapbook binder to hold my patterns.


My Pattern binder is my crafting bible. A day does not end that I haven't pulled it out to retrieve or return a pattern to it's place. I love that one character will inspire another.


Tucked alongside my Hoosier is a pink dolls cupboard that has seen it's better day, but is just the place to hold crafting supplies used most frequently.


Every creative person needs a special spot to sit and ponder. Mine is a porch rocker under a beloved Christmas movie poster. It's colors and theme set an every day holiday mood.


Pillows for comfort, the Heart of Ohio a gift from the sweetest of blogging friends, Renee of My Vintage Mending . The afghan was made by Twyla of Two Crazy Crafters.


A lampshade I embroidered to read beneath, a little chef shaker tassel to remind me of my daughter's culinary days. Girl Friday? A signature tag line seen in my paper art.


A most frivolous purchase that had to be made, a battered red magazine rack for my Go-to issues of Mary Englebreit's Home Companion.


Also red and so special to me, is this peg rack that holds so many of the tags of women who have been kind enough to share their paper art with me as well as their friendship. Smiling here, this peg rack always does this for me.


Another surface for displaying cute, a "borrowed" trellis to change with the seasons. Ribbon used most frequently is kept in these three plastic jars.


A banner from Holly, Cutie Pie Cottage for the Friendship Garland I will hang to remind me of the women who most inspire me in this special place.


A top drawer contains my most used crafting supply, woolfelt from Joggles. A page from my pattern book lets me know whose presence is required next for holiday entertaining.


A second drawer contains vintage crafting elements, a third drawer Styrofoam and Paper Clay, a fourth shipping supplies.


I so enjoy looking at every single small detail of my own craft heroes, I do hope you are enjoying looking at the many details of my own creative space. The little canning jars will be Button Keeps for every month. I hope the readers of my blog will join in the fun of creating twelve different toppers and share them with us all.


Kept on the bottom shelf of this bookcase, a moment of silence please, are the familiar spines of the most wonderful magazine every published. What a joy Mary Englebreit has been to so many of our lives.


Nearing the homestretch now, a beloved craft desk with a view. A view of the wonderful Pennsylvania Dutch painted Hoosier and leafy Norwegian Maple brilliantly colored in the fall just over my shoulder. I love this space, I truly am my most happy self here. There are leaves on both sides of the table should more room be needed. The little oval table holds extra supplies as I work.


I create most effectively within the confines of a small space. It helps me to see the familiar in new ways. My crafting tools are basic and minimal in the hopes of demonstrating that creativity is not hampered by limited access to new supplies.


A Santa in July? His cheery presence can be felt throughout my crafting space.


His favorite color, mine as well.


A final corner cupboard holds finished crafts for Giveaways and for sale.


A ME style container holds vintage greeting cards. Their nostalgic graphics inspire my work.


A spice rack makeover keeps small items neat and tidy on the last wall spot available, hung just above the cutest squirrel bookcase ever.


We have finally made our way back to where it all began. A Bluebird cute as can be, Creative Breathing a place I am so happy to share.


Thank you very much Karen for the opportunity to participate in this wonderful exchange of creativity.