

Oh My Gosh! I love to make these little vintage shadow boxes. They wonderfully capture milestone remembrances in a most nostalgic way.
I always check the sale isle for the cute little boxes chipboard letters come in. They have a hanging cord already built in. This month I have used a card from my October Afternoon's Cakewalk Miscellany package and a vintage card that had a beautiful shade of blue on the inside. Images of cute cottages are easy to find on Flickr.

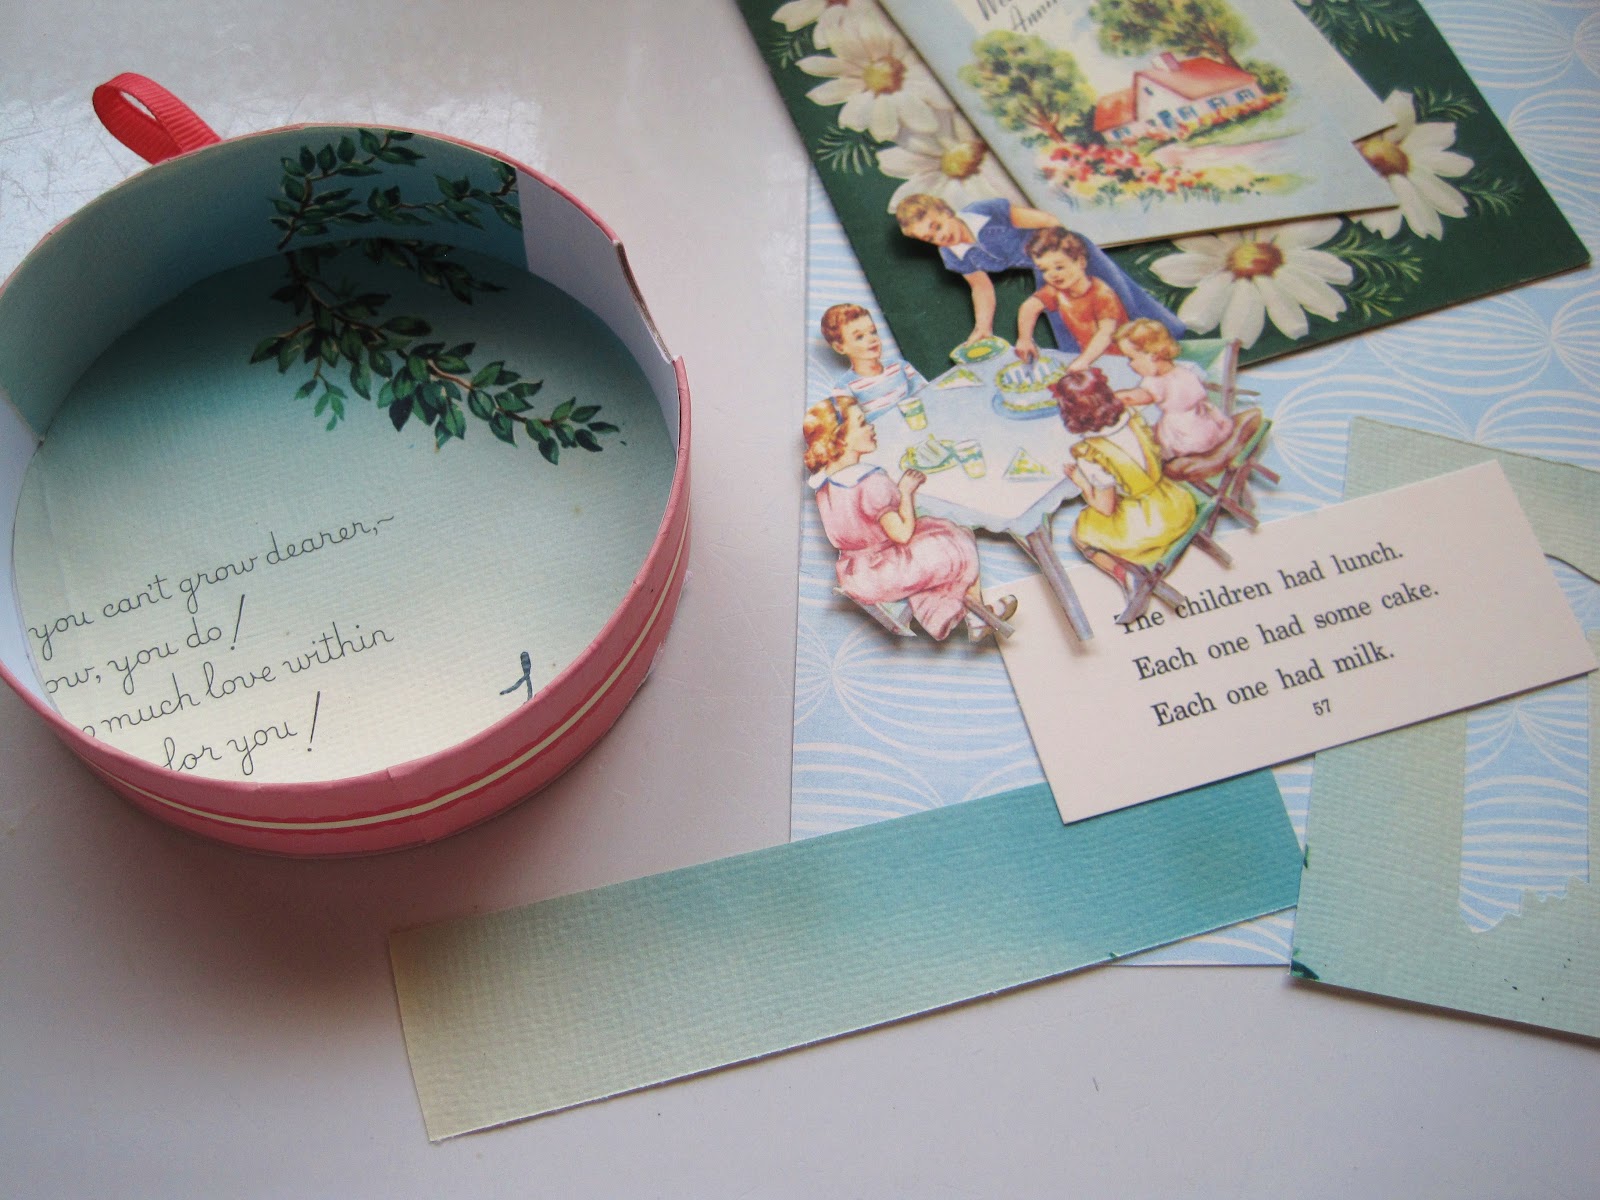
STEP 1. Trace circular shape of box onto children's party image to match curve of box. Cut away background.
STEP 2. Trace box onto background image. Cut 1" strips to line inside of box. Glue both in place.
STEP 3. Use two layers of Pop Dots to stand cottage image away from background. (I covered words from card with miscellaneous greenery images.)

STEP 4. Cut strips of paper slightly less than 1 1/4", punch hole for ribbon, glue in place.

STEP 5. Trace box onto patterned paper, pink and glue in place. (I added another card from Miscellany kit)

STEP 6. Apply hot glue to tips of image that will touch box edge, adhere close to front of box. Magical!
STEP 7. Trim edge of box with tinsel, scalloped paper, flowers, etc.
27 comments:
Sing it, Sister! Although technically with summer here, it doesn't feel much like vacation since it means I'm now with the kids 24-7!
Ohmigosh!!! That's the cutest... everything!! I can't pick one thing that I like more!! :)
And that shadowbox is SO incredibly cute! You've inspired me to make one! Love it!
It's always nice to be on vacation :) I can't say how much I absolutely love your summer banner and that shadow box!!! Those houses and that cute little bird...ahh! :) :) xo Holly
Elizabeth, thanks for sharing your wonderful crafts!! Vacation days are the best!! I am looking forward to mine, starting next week!! I just may have to attempt a shadow box on one of my days off!!
chris
E,
Another fun tutorial!!!! These little boxes are so cute and they are endless in combo possibilities! I love both the box and the new sweet little banner....thanks again Elizabeth, it just makes such perfect sense now...:):) Hugs, Sandy
I wondered where you got those shadow box hangers...I thought they were the top of oat containers. Remember those? This is delightful, almost ornament like. I can imagine a tree full. Loving your banners. What a sweet thought of vacation mornings...smiles...Renee
Love your banner, Elizabeth, but I have a big smile and good feeling inside from your shadow box! It reminds me of the images in books I read when I was a kid and makes me think that the images show a simple and happier time. I just love it!
This is so interesting! I'm going to have to think about this...and see what I can do. We are retired but every day, I am so focused on what I need to get done. I need to learn to take it easy....and take a few fun days! I love what you've created! I can't wait to make something...just for the fun of it! Sweet hugs!
I'd like to spend a vacation day in your cute as can be craft room gazing at all the sweet creations you have there.
Enjoying reading your "happy" blog news. You can actually read the happiness and the joyfulness that you are experiencing.
The shadow boxes are precious.
Happy week...Cindy from Rick-Rack and Gingham
Summer and fun--two words that definitely go together. Happy Vacation! Love the banner and of course the shadowbox. Thank you for sharing the "how to".
Tresa
I love this tutorial! I love the way you bring the design right onto the sides of that cute shadowbox. I want to make one -getting out the vintage images as we speak. E.-this is so adorable!
What a beautiful creation!! Thanks for sharing how you make them!! Love the sweet graphics!! Always inspiring Elizabeth!! xo Heather
I'm glad you blogged today. I needed an E fix:) Cute shadowbox! You always chose the best images ;)
Oh Elizabeth you are so inspiring. You have just given me a great idea. Thank you so much for sharing.
Hugs
donna
This turned out so sweet E! I think that you have started a new Craze, I want to make one too!
The shadow box is such fun...I never thought to use a round box for one. It's perfectly wonderful!
It reminds me of the dioramas we used to make in school. Much cuter though! Love it!
What a cute little shadow box... you know I love paper crafts ox
I just love love love LOVE this!!!!!
Thanks so much fot the tutuorial! These will make great stocking stuffers for my book club friends!
Blessings
Linda
I LOVE it! That would make the BEST gift! ;p
Oh E, this is just so sweet! Do you know you have the most amazing sense of detail and placement? Truly an eye for the fundamentals of design. Thank you for sharing this wonderful project! xoxo Nan
Oh! I love this shadowbox! It's so cute! Congratulations! I can't stop watching it...
Besos from Argentina! Silvina
I have always loved shadowboxes in all shapes, sizes and subjects. I have a few boxes that I have put back to do this one day. This has inspired me. Such talent.
Great placement is here when i saw that i am really so shocked and also i am very impressed with your post can you more share here i will back soon as soon possible.
Post a Comment