Sunday, December 20, 2009

"Partners In Crime"


Christmas shopping needing to be completed, my mother and her closest friend Mrs. R decided they would combine their efforts with a trip to the Mall.  Mrs. R had a slight "My children are better than your children." attitude. She hesitantly left her son with his Partner in Crime, my brother John as they had been banned from Montgomery Wards for life the previous Christmas. They were only eight!


Not ones to miss an opportunity to eye spy their gifts, the boys hid themselves in the trunk of the car, a screwdriver handy to let themselves out once at the Mall.  It worked like a charm; but the mothers were very slow shoppers, and the boys were bored and hungry. Money for the food court soon gone, the boys returned to the car only to discover their mothers had already left!


With not a dime between them they had no choice but to make a collect call from the payphone in the Mall. "Hi, Mom. Can you come and get us?" "Get you? Where are you??? At the Mall!!!!"


Partners in Crime, brothers at heart, the two boys could not be kept apart.

Friday, December 18, 2009

"Dash-Away All" Penny Rug


  I love holiday baking and thought a penny rug would be the perfect way to capture these memories. Can you see my cookie jar is waiting for my Reindeer Sugar Cookies? He is traced from a cookie cutter I have used for years!


Supplies: 1/2yd white felt, 1/4yd red felt, 1 piece tan felt, 1 piece aqua felt, 2 skeins white floss, 1 skein red, 1 skein aqua, black. Large scissors, small pointed, pinking sheers. Button hole stitch, outline stitch, basting stitches. Print pattern to fit standard copy paper size.

STEP 1. Using circle pattern or 15" plate, trace on back of white felt. Place scallop pieces ABUTTING traced line, trace 19 scallops around circle. Repeat on second half of felt for back piece. Cut out.


STEP 2. Trace rooftops flipping pattern over at fold line. Cut out. With small pointed scissors snip windows and doorways if desired. (Snow on roofs uses pinking sheers, one long piece cut to size)
STEP 3. Using long running stitch, baste rooftops 1/2 inch above scallops allowing room for snowflake circles. Use 2 strands red floss, button hole stitch to attach. (Don't be afraid to gather felt in hand. Turn piece in hand as needed to stitch. Go slow, don't become frustrated!) Snow is attached with tiny single stitches, 1 thread, white)


STEP 4. Following natural curve of rooftops, lightly pencil mark same 1/2" from scallops to create complete circle. Use 3 strands red, outline stitch.


STEP 5. Use one strand white floss, long running stitch to create curve to write "dash-away all" about 1" from red circle edge. Use pencil to write words. Two strands red floss, outline stitch. NOTE: DON'T worry if your letters or spacing aren't perfect. This is why there is a "dash" and little blue snowflakes to "even things out". I call this "CHARM"!!!


STEP 6. Cut 1 tan, 1 white reindeer same size. Slightly trim white reindeer to create icing appearance. Button hole stitch icing to cookie 2 strand white. Apply nose with small tacking stitches, eye can be a bead or black satin stitch. Baste reindeer in place with LONG running stitches 1 strand white floss. SMALL running stitch cookie to background with 1 strand white very close to white felt edge.
STEP 7. Button stitch blue snowflakes where needed to please your eye (or cover any mistakes!) Snowflakes, 2 strands white through all layers.


Step 8. Sew snowflakes on each circle, 3 strands white.
Step 9. Button stitch circles in place, 2 strands aqua. ALMOST DONE!!!
Step 10. Baste finished top to bottom piece matching scallops. Baste together using long running stitches, 2 strands white. Button stitch around all edges, 3 strands white. NOTE:( I also used 2 strands white small running stitches just next to rooftops and red outline of circle to give stability. Optional) Remove all basting stitches. Iron lightly on back of penny rug.

Sunday, November 22, 2009

E and Bluebirds


Another heart in the mail! This one is so extra special to me because it is from a most talented and lovey woman, Dee of Lulu at Home. I had a most difficult time opening her beautifully presented bundles.


It is because of Dee as well as Jenny B. of Allsorts that I came to be aware of vintage childrens book illustrations. Both have generously shared their images with all of us. Dee transforms images into the most charming keepsake art that I have ever seen! This button card is calling for a frame and a special place to hang.


Dee hopes to have a blog to share with us in the new year. I hope it will feature her exquisite sewing skills. This heart tells such a sweet story, I just love it!


Dee is also very special to me because, like myself, she became overwhelmed with the social obligations we place upon ourselves in the Flickr community. Worry about not responding to every kind comment, worry about offending others, it all becomes too much. My hope for Dee is that she will find a way to share her remarkable talent with us while finding the right balance for herself. This has been my journey, and I am so thankful to still be here.


Wednesday, October 28, 2009

Yellow Woods

Today as I was driving home on a familiar road, a glint of yellow caught my eye. I kept driving; but by the time I arrived home, I knew I had to get Charlie and return to investigate.
Making my way through surrounding greenery, Charlie and I both stopped at the same moment stunned by what lay before us. A yellow carpet of untouched leaves.
I had to coax him into the stillness of the woods. The black trunks against the yellow brought to mind my favorite poem learned in fifth grade by Robert Frost.
"Two roads diverged in a yellow wood... long I stood and looked down one as far as I could until it bent in the undergrowth..."
This unexpected beauty was just what was needed today.

Sunday, October 18, 2009

Murder In The Dark

 I believe sleepovers in childhood take on the character of the month. I know this was true of October and the Bobwhites. Meeting time 6 o'clock sharp. Belongings of worth tucked inside my pillow case, music albums and games clenched under my arms, a final goodbye to my mother as I left the warm glow of my own home. The rustling of leaves across blacktop, unseen dogs howling, supposed movement behind every tree. A sigh of relief at the welcomed sight of our Only Child's porch light. All present, we were safe from the darkness of the night.


Friday night sleepovers were a ritual with the Bobwhites. Popcorn and brownies, boy talk and board games, quieting threats from upstairs, Charlie Chan on the Late, Late Movie. We loved Charlie Chan and Number One son! At the conclusion of the movie there were always calls to play "Murder In The Dark". Names drawn from a hat. The murderer and the victim. Everyone in place, lights off, bumbling and laughing, a whisper in the ear, "Your Dead!" A dying sigh, a collapsing clump, "Murder In the Dark!" We never could figure out how to deduce who had done the killing since the murdered victim wasn't allowed to talk, but this never deterred us from playing this game over and over assuming the characters of Charlie Chan and his wonderful movies.

Tuesday, August 18, 2009

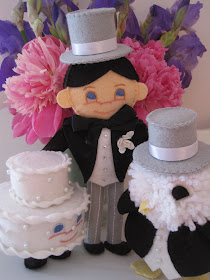
$40.00 a Minute Wedding


For thirteen years my brother and his childhood friend Greg lived at the Oxon Hill Manor House. Free room and board through their college years and career beginning jobs in exchange for setting up for the grand weddings that would take place in the beautiful ballroom.


On the day of weddings, John and Greg were required to wear brown one piece shiny jumpsuits that had embroidered oval name tags. They were required to wear these as directed by a woman with a tight bun and click clacky heels. 

Parquet floors reflecting the warm glow of crystal chandeliers, grand piano in place, the lead soprano of the Washington Opera awaiting her accompanist to begin her warm up. My brother notices her distress and approaches her. "I can accompany you if you have your music."


The strands of La Bohemia reaching the event director's office were soon followed by the click clacking of her heels across the marble foyer. "How many times have I directed that you are NEVER EVER to touch this piano! This is a $40.00 a minute wedding! It is specially tuned. Your job here is done for now, wait in your room until I call you."

Click clacking again across the marble foyer just in time to catch my brother as he ascended the beautiful staircase to his room. "Do you have a tuxedo?" "Yes, I have a tuxedo." replied my brother. "Then put it on quickly and meet me back here in ten minutes."


My brother did as he was told. "The accompanist is unable to be here. Can you play for the soloist?" My brother, tall and handsome in his tuxedo politely replied, "No I can't. I'm worth more than $40.00 a minute." With that he calmly returned to his room.


Monday, August 17, 2009

The Block Party

The end of a party is always the best. Tired from milling about the guests will settle themselves comfortably, quietness settling about them. Lamps are turned on, shoes are kicked off, legs are tucked underneath. The day's events are recalled, moments of observation shared.


A circle of women making room for someone new. A compliment here, an exclamation there, shared values drawing them close.

Shared laughter letting them know they are not alone.


I am not a Giver of Parties content to be an invited guest. Fearful of being the center of attention, fearful of saying the wrong word, fearful of disappointing.


Hosting my first tag swap is such a milestone in my journey. I continue to struggle with the acceptance of friendship; but as  I gaze at the art of the women who shared themselves with me, I am surrounded by friends. Elizabeth

Friday, July 24, 2009

Scottie Garland


Who doesn't love a banner celebrating all things Scottie dog! There are so many wonderful vintage greeting card images of this most beloved terrier to be found on Flickr.
 
I used as the base of my garland, four inch squares cut from card stock. With each layer of printed paper added, I assured my paper art would look as fresh as when made, years from now. I chose coordinating papers and limited my main colors to three; red, yellow, and blue. My secondary color is aqua, and my anchor color is black.


I love garlands that spell out a word. My word was easy to choose.... S C O T T I E !!! Because I love words so very much, I added additional words to each square.

I used black rub-on's for that anchor I talked about. A great tip when creating with paper is that they should never "drop" as it moves along. The black I have used causes the eye to move as though following rick-rack.

Buttons! There always has to be buttons! And do you notice all of the little odd words? They are found at the bottom of the CC paper. The names given to each pattern of paper make me smile.

Here I used two half moon shapes to each side of my square. An envelope flap would also be cute.

On each square I chose one element to stand out by using sticky foam pieces. Here I made the window frame stand above the little Scotties playing. So Cute!

A last step to add additional sturdiness and to continue the theme of the flash card words. I have added them to the back of each tag. A hole punched in each corner, a ribbon length knotted at each end to connect the squares.

Crocheted cherries to anchor the ends of my garland, and there you have it! A Cute as Can Be garland to hang in my craft room.

Sunday, July 12, 2009

Elizabeth's Pegdoll


I love pegdolls! I love that there are endless ways to express your own personality with just a clothespin and a bit of fabric. I thought I would share my pegdoll voice with you in the hopes you will join the chorus!


Gather your supplies, and set aside an afternoon. The wooden pieces can be found at your local craft store. A few basic paint colors, craft varnish, paint brushes (use what you have), felt for this version, and your trusty glue gun. Pipe cleaner, embroidery floss is optional.


I love my efficient system for painting the pieces. (Otherwise you have heads and bodies rolling everywhere!) For our pegdoll today, paint white for her boots at the bottom of the pin. I paint three coats of each color.


Transfer your base to your pin, and paint the bottoms same color as base. When the paint is thoroughly dry, glue the head in place. Your doll is ready for a face.


My face is very easy to paint. Eyes are the distance apart of the body opening. Cheeks just to the right of each eye. Mouth begins in the center of the eye, sweeping to the left. Notice the brushes? Easy, peasy! Two coats of varnish, drying between each coat. It is time for a basic dress pattern that I have used in many variations for my dolls.


Click on pattern to enlarge, print. Look at finished photo for colors.


Center and glue sparingly the bodice to body, butting edges in back. Center skirt on bodice, stretch felt around waist to meet in center of back, glue. (NOTE If you want a white trim, do that step first.)


The sleeves have also been embroidered as a detail but not necessary. Pipe cleaner is cut just a bit longer than sleeve.Two mitten shapes are free cut and glued to each side of pipe cleaner. Roll one side of felt around pipe cleaner adding a thin line of glue just before reaching the other end. Make sure your thumbs are facing the right way! Bend arms slightly and glue in place on bodice
.

The uniform front is embroidered and glued in place. Little details are also made. A tooth pick and tiny poms for the baton, floss tied in a knot and trimmed for boot tassels.


Hair that you can glue on? How wonderful! Strips are rolled in the fingers. Apply a dot of glue to the last turn to secure and on the back of the remaining tab to glue in place. Two strands of floss tied at one end and twisted in opposite directions, bring ends together to form a braid for the hat.


Dolls that are not going to wear a hat have curls that cover the entire head.


Hat band proportion is just slightly narrower than sleeve width. After gluing to hat top and brim, I trimmed any excess felt. A feather, a little sparkle, this majorette is ready for a parade!


I love that you can identify the creative voice behind each pegdoll by specific details they incorporate. My voice is a simple one. I want the doll to immediately capture a remembered moment by their clothing alone. If I do add a prop, just one. The hair? Well I have been known my whole life for my hair; so that is my signature touch. I hope will be inspired to create your own pegdoll voice!